
Making high quality costumes for comic conventions can be tedious for non-cosplayers, so I decided to create a quick tutorial on how to make an Axe Cop costume.
I had been contemplating what costume I would wear to Phoenix Comicon. I didn’t want it to be a “female sexy” costume that revealed every curve of my body or an exorbitant amount of skin. I didn’t want to break my bank account and most importantly I didn’t want it to take too much effort to put together. For me there was really only one choice… AXE COP!
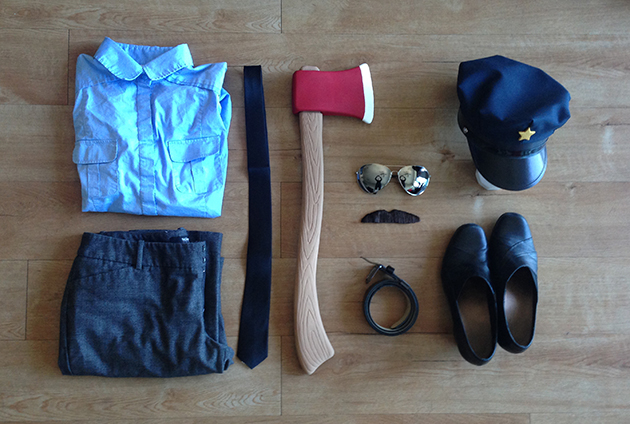
After a quick stop at our local costume shop Easley’s Fun Shop and a craft store nearby I had what I needed to get going. Below you will see a list of parts, along with a couple step-by-step tutorials to get you started on your Axe Cop costume.
Parts for Axe Cop Costume
- Police Hat – Navy
- Star – Gold, small
- Police Badge – Gold
- Sunglasses – Aviators in reflective metallic
- Mustache – Brown
- Axe – Plastic silver/grey “Tin Man” axe
- Button down shirt – 3/4 length sleeves in light blue
- Neck tie – Black
- Dress pants – Grey
- Shoes – Black
- Belt – Black
- Paints for Axe and Star:
- Holiday Red (Craft Smart)
- White (Craft Smart)
- Golden Brown (Craft Smart)
- Metallic Splendid Gold (Dazzling Metallics)
- Paint brushes
- Super Glue
- Pencil
- Scissors
Step-by-Step: Axe Cop’s Axe (2 hours)
- Step 1: Disassemble the axe. Thankfully the “Tin Man” axe I got from the costume shop was able to come apart and I didn’t have to worry about making mistakes around the edges. The axe head came off perfectly from the handle. I had painters tape handy, but never needed to use it.
- Step 2: Paint the axe blade: Painted it red and set it out to dry. Took about 2-3 coats for the nice vibrant red you see in the pictures.
- Step 3: Paint the axe blade tip: Once the red dried, I used a pencil to lightly draw a line for the tip of the axe blade. I carefully applied white paint along the edge to get the fine line I wanted, then filled in the rest. Took about 2-3 coats for the bright white.
- Step 4: Paint the axe handle: Painted the handle with golden brown and set it out to dry. Took 2-3 coats for the vibrant golden brown color.
- Step 5: Reassemble the axe. Use touch up paint as needed. I had to fix the top of the handle because some of the paint came off when putting it back together.

Step-by-Step: Gold Star for Police Hat (45 min)
- Step 1: Paint a metallic gold star: The costume shop didn’t have gold stars that would work for the hat so I purchased some small foam star stickers and metallic gold paint. I painted the stars with metallic gold paint and super glued one to the front of the hat. I did a few extras as back-ups.
- Step 2: Add gold star to the police hat. The foam stars that I got already had adhesive on the back and I reinforced one with super glue. I held it in place for 30 seconds to ensure the glue was set. I purchased the police hat at our costume shop.

Final Costume Assembly: (15 min)
Once the police hat and axe were completed, the rest was super easy. I was able to purchase the police badge, aviators, black tie, and the mustache from the costume shop. The mustache needed a bit of trimming to look more accurate, but that was super easy to take care of with a pair of scissors. I already owned the light blue shirt, grey pants, black shoes, and black belt so no added work there. Put everything on and there you have it!
Axe Cop was an easy costume to assemble and looks great for any comicon. Give it a try and I now I’m going to call you “Axe Cop!”


That was simple and efficient. Thanks